How to sell subscriptions on Sendd
Set up recurring billing plans with flexible pricing and intervals for memberships, boxes and more
Category: Ways to sell
If you want to turn one-time buyers into recurring revenue, the Subscription product type on Sendd lets you sell plans that bill customers automatically on a schedule you choose. Whether you are running a membership site, a subscription box or an ongoing coaching program, you can set up recurring billing without writing any code or managing invoices by hand. This guide walks through building your first subscription product, choosing intervals and understanding how payments and subscribers flow through your store.
What it is and when to use it
A subscription product sells access to something on a recurring basis instead of a single purchase. Customers pay upfront and then continue to be charged automatically at the interval you set (for example every month), until they cancel. Recurring billing runs through your connected Stripe account, so you need Stripe connected before you can collect subscription payments.
Reach for a subscription product when you are selling:
- Memberships, communities and clubs
- Subscription boxes shipped on a regular schedule
- Recurring donations or patron tiers
- Ongoing lessons or coaching sessions
- Software or content access that renews automatically
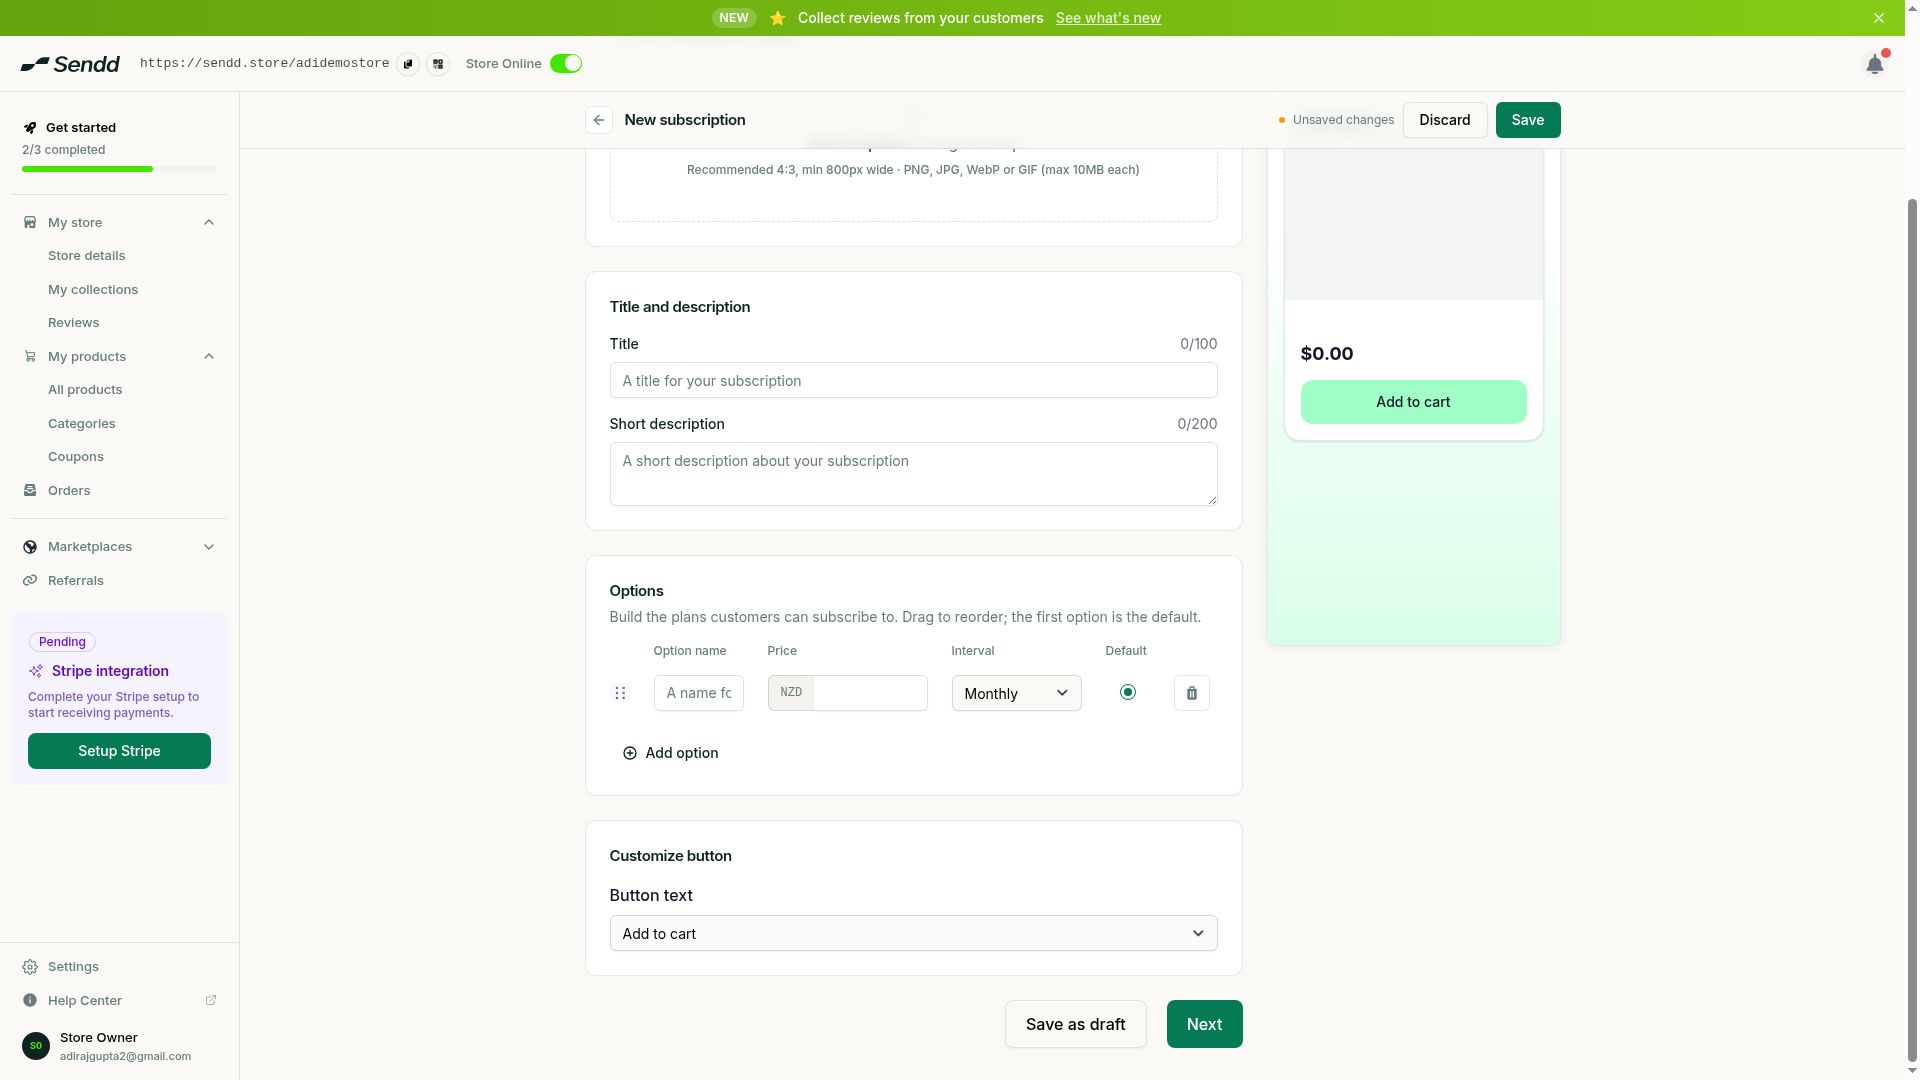 Build one or more plans, each with a price and billing interval.
How to create a subscription product
Steps:
- Go to
My products, then selectAll productsand selectAdd new product. - Choose the
Subscriptionproduct type. - In Step 1, fill in the usual preview details: your product title, description, gallery images and price section.
- Scroll to the
Optionssection to build your plans. Each plan needs anOption name(for example “Monthly membership”), aPriceand anInterval(for example Monthly). - Select
Add optionto create additional plans if you want to offer more than one tier, such as a monthly and an annual option. - Drag your plans to reorder them. The plan at the top with the
Defaulttoggle switched on is the one shown to customers first. - Continue to Step 2 to complete your details page, then move to Step 3 to review product options before you select
Publish. - Make sure Stripe is connected to your store so subscription payments can be collected once the product goes live.
Understanding the options and fields
Each plan you add in the Options section behaves as a distinct pricing tier that a customer can choose at checkout:
- Option name. The label customers see for that plan, such as “Monthly” or “Annual VIP”.
- Price. The amount charged at each billing cycle for that plan.
- Interval. How often the customer is billed, for example Monthly. Different plans on the same product can use different intervals.
- Default. A toggle that marks which plan is preselected for shoppers. Only one plan should carry this toggle at a time, and it is normally your most popular or recommended tier.
You can add as many plans as you need using Add option, so a single product page can present a full menu of subscription tiers rather than forcing you to create a separate product for each plan.
Use case examples
- Membership community. A creator sells access to a private community with a “Monthly” plan and a discounted “Annual” plan, setting Monthly as the default so most visitors see the lower commitment option first.
- Subscription box. A store ships a curated box every month and offers only one plan, “Monthly box”, with a fixed interval and price.
- Coaching program. A coach offers “Weekly sessions” and “Bi-weekly sessions” as two separate options on the same product, letting clients pick the cadence that suits them.
Tip. Offer both a Monthly and an Annual plan on the same product page and set Monthly as the default. Shoppers who want to commit longer can still switch to Annual, and you capture both preferences without building two products.
Note. Your subscription product will not be able to take payments until Stripe is connected to your store, since all recurring billing runs through your connected Stripe account.
Frequently asked questions
What is a subscription product on Sendd?
It is a product type built for recurring billing. Instead of a single payment, the customer is charged automatically at a set interval, such as monthly, until they cancel.
What billing intervals can I offer?
You choose an interval for each plan in the Options section, such as Monthly. Different plans on the same product can use different intervals if you want to give customers a choice.
Can I offer multiple subscription tiers on one product?
Yes. Select Add option to add as many plans as you like, each with its own name, price and interval, and drag them to reorder how they appear.
Do I need Stripe to sell subscriptions?
Yes. Recurring billing runs through your connected Stripe account, so you must connect Stripe before your subscription product can collect payments.
What fees apply to subscription sales?
Sendd charges a 1% platform fee per sale on top of your own pricing. Payment processing fees from Stripe are separate and apply in addition to that.
Can I offer an annual plan alongside a monthly plan?
Yes. Add a second option with an Annual interval and a different price, then set whichever plan you want shoppers to see first using the Default toggle.
How do customers manage or cancel their subscription?
Subscriptions are billed through your connected Stripe account, and subscribers along with their orders appear under Orders in your dashboard so you can track and manage them.
Where do I see who has subscribed to my product?
Check Orders. Your subscribers and their recurring orders are listed there alongside your other sales.
Next steps. Before your subscription plans can take payments, make sure your store is connected to Stripe, and once customers start subscribing you can track them from Orders.
Related articles